


3. Now deselect your fill colour swatch to none and pick a colour for the stroke. We are going to do the lamp shade part first. I chose a navy colour.

4. With your path selected go to Effects - 3D and click Revolve to bring up your 3D options.

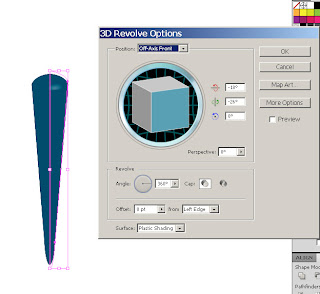
5. Now set your options the same as the image below. It might be defaulted this way but do check so it is correct.

6. Press the preview button to check that your 3D path looks the same as the image below.
7. Now hover your cursor around the top right corner of your path to transform the shape. I am going to turn to the left to get the desired effect.


8. Once you have done this, press new layer and start drawing the path for the pole/base of the lamp. Do not close the path off. Like this image below.

9. We are going to do the exact same steps we used to make the lamp shade above. Once again deselect the fill colour and select a stroke colour as you can see above the part highlighted with a yellow circle. I chose a gold colour.
10. Apply the exact same Effects as the lamp shade Effects - 3D and click Revolve.

Your result should look like this image below.

Apologies for the shadow on my image, I do not know why that keeps happening!
11. Now move the Lamp layer above the pole layer so that the pole is not above the lamp.
Your finished result should look like this.

Now you have made a simple 3D Table Lamp! You can now add some detail if you like to the shade or a background. I hope you found this tutorial useful.

No comments:
Post a Comment